APC40 Programing, (a learning thread) PLEASE HELP.

JuanSOLO

2012-01-16 00:08:53

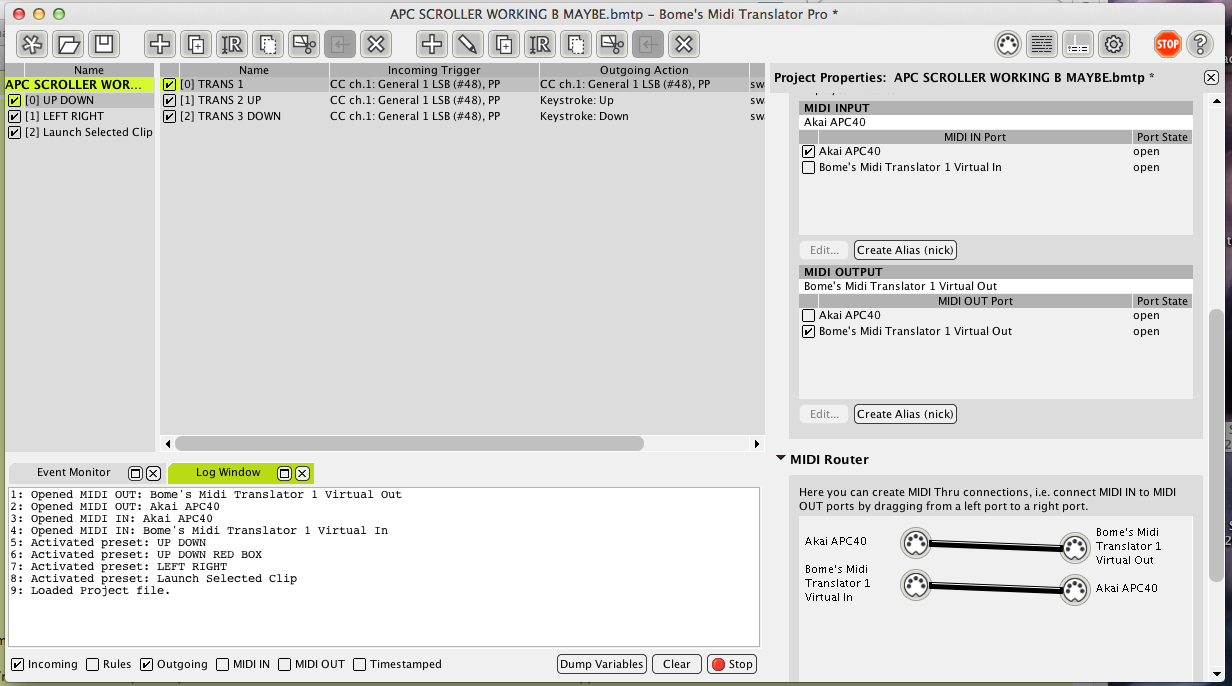
OK so I have had Bomes for a few years and never dug in. Lately I have been using it a lot to add extra "Modes" to strays apC_CL3 template. For example a mode for Reaktor's Vectory where the Clip Matrix is 2 4x4 grids, 1 Red 1 Yellow, and the bottom row of the clip Matrix is Green.

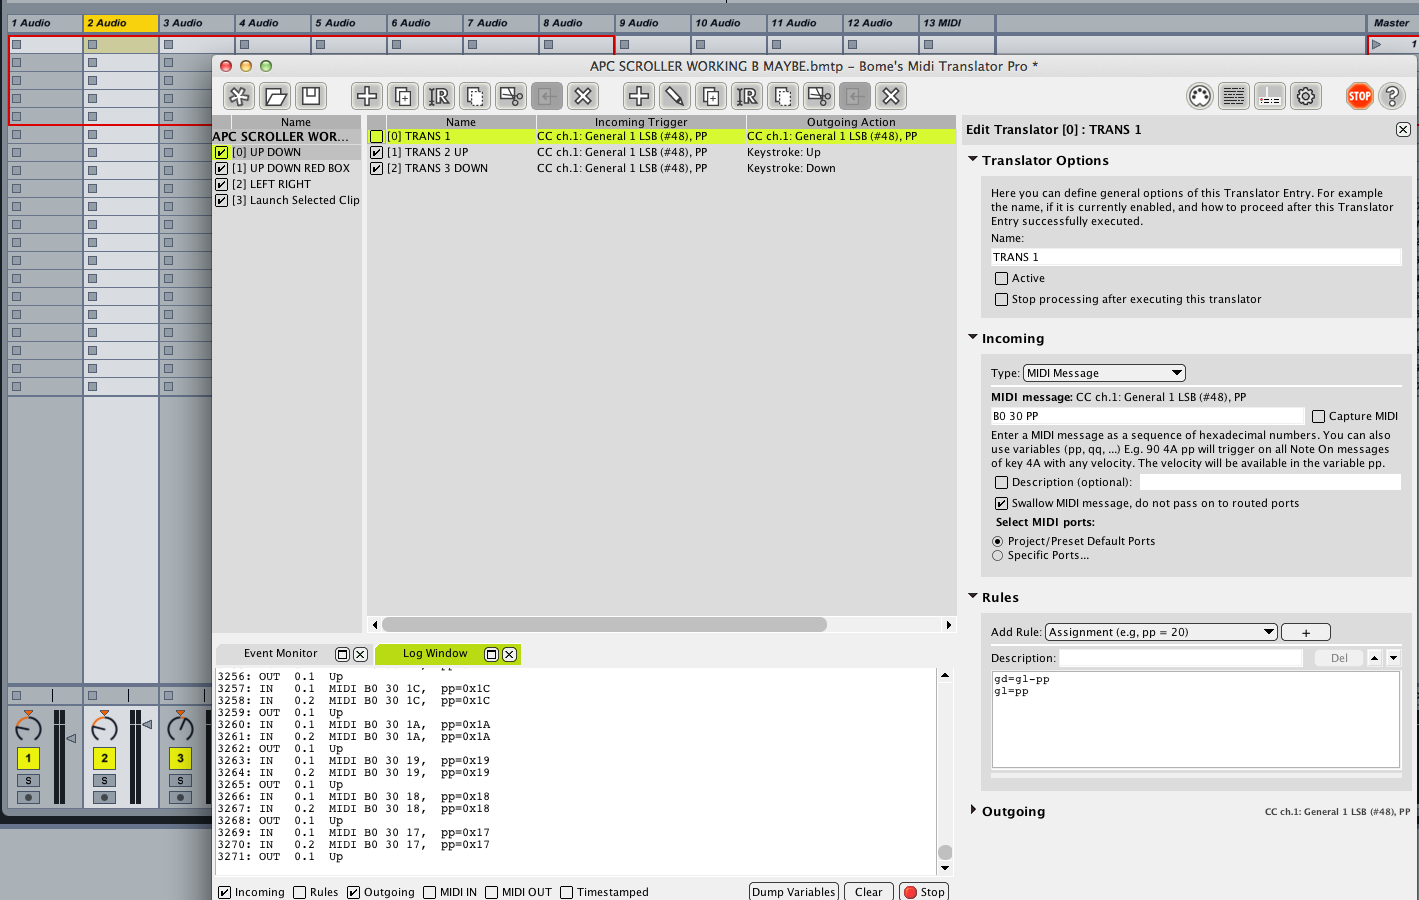
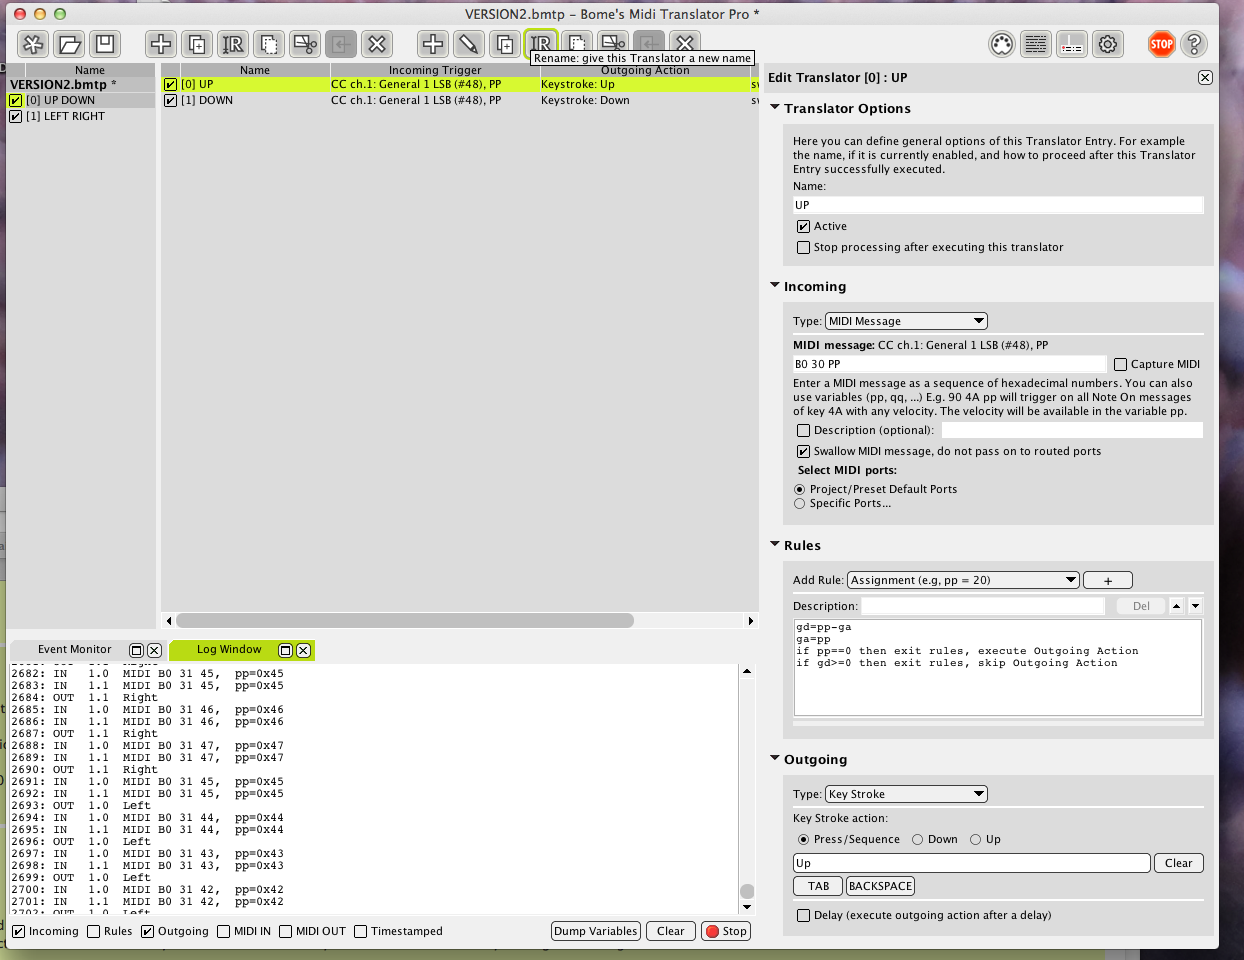
I can achieve most of what I want using translators that activate and deactivate various MODE presets. I can get LED feed back to some degree. My trouble is in understanding RULES and GLOBALS in Bomes. I know my Bomes template could be much more streamlined if I understood these principals better.

SO, I am asking for help by maybe coming up with some basic questions to understand how to make a more complex, yet more efficient template.

This is what I want to learn first.

Lest say I have 2 different modes.

Mode 1, ALL the Matrix buttons are YELLOW. When I press a button it turns RED, if I press another button it turns RED and the previous one goes back to YELLOW.
Mode 2, ALL the Matrix buttons are RED. When I press a button it turns YELLOW, if I press another button it turns YELLOW and the previous one goes back to RED.
NOW, I also want to be able to switch between these 2 MODES and when the Matrix updates to the currently selected MODE, I want it to remember where it was at before, which button was/is active.
For example, if in MODE 1 (YELLOW MODE) I have pushed the top left corner button and it is RED, then I switch to MODE 2(RED MODE) and the bottom right button is pushed/activated YELLOW, when I switch back to MODE 1 I want it to update where it was with the top left button RED, and vise versa.

HOW do I achieve this kind of LED updating/memory?

JuanSOLO

2012-01-16 19:24:53

14 views and no feedback? Is my post confusing? I tried to make it simple as possible.

soulpixel

2012-01-18 00:29:42

Hi Juan,
your post isnt confusing, as far as I am concerned it only misses one bit of information: what does a pressed pad do? Play a clip ?

Globals are variables that you can call/modify across all presets. They basically store information.
You use rules (among other things) to retrieve or to modify Globals.
Rules are triggered by events.
So if Event A occurs, lets say, a button is pressed (or released) then you receive a message, an event occurs.
If you want something to happen you write a rule. If you want to set a condition according to some data in another preset or data in the current preset but not determined by the specific event(for exemple) you can call a Global and according to its value you may trigger one or another action.

I m not familiar with the APC's midi, and I might be very wrong with my approach.
But anyway, I would create 2 presets and would use 2 globals to define the background color(unpressed state) and the foreground color(pressed state) per preset and would switch those when activating a preset.
Do the leds colours on the APC work with a specific range ?
I am, again wrongly guessing but you could store the range values as globals and then pass those through the outgoing action. Might not even need a rule.
You would need to set the colour for a pressed pad through Ableton though, by for example retrieving the state of a clip(if it is playing or not).

I hope that I am not confusing you and even more, that I am not leading you in the wrong direction, but I am unclear as what a pressed pad does, because when switching presets you would need to retrieve the state of a clip in order to set its colour.
You could get that from ableton or you could store the status of each clip in a variable, but you have a limited amount of Globals in Bome.
Anyway, here's a tutorial for Bome http://www.skratchworx.com/reviews/bomes1.php.
I have an APC and Bome, and wont promise anything because right now I am configuring some controllers in Traktor, but let me know if I can help.
Cheers.

JuanSOLO

2012-01-18 21:28:56

I understand the theory behind globals and rules, it's using them that I can't seem to figure out.

With my above example, the matrix buttons would just be sending a note. note on off "toggle" I want the button to change color after I have pressed it, and stay that color unless I press another button. These outgoing notes would be activating different stuff in a Reaktor Vectory plug in Ableton.


SO, I understand the theory, and what your saying about setting up globals, one for pressed one for released, I've heard that before. I need a visual example of how to assign globals, how rules work. The rules section confuses me. For example, I will want to write a rule that says. if xx==80 then xx==90 else skip rules. But there is no else? I guess is what I am saying is I am familiar with conditionals, but I am not sure how they work in Bomes, it's just slightly different than what I am used to and it confuses me. My if then is probably a poor example.

So yeah, I dont know how to assign Globals, OR how to implement them once they are assigned.

I need some examples. Examples that I can make since of. Hence my post.

Thanks for responding, seriously, this forum is not visited very often. Seems like once you learn Bomes well there's no real reason to come back.

DvlsAdvct

2012-01-26 06:19:35

Hi JuanSOLO

I'm sorry it's taken so long to get a response. I wanted to let you know I've seen your post and will get you an answer tomorrow. I'm fried from travelling and I think whatever it is I type will make almost no sense. If you don't hear from me within 24 hours respond to this and I will get right on it.

Sorry again
Jared

DvlsAdvct

2012-01-26 17:50:27

Alright, there are a number of ways you can get your initial setup. I'm actually glad that my article on Skratchworx was linked as I'm hoping to do a ton more of those, but it doesn't really help what you're discussing now.

So the easiest way to set this up is to have three presets, labelled Mode Switch, Mode 1 and Mode 2. In Mode Switch you will put all of your translators to switch presets, and in each Mode you will have all of the translators to control the LEDs AND the commands being sent from them. Before we get to that we'll discuss global variables and conditional statements in the rules.

There are two kinds of variables: local and global. Local variables are oo, pp, qq, rr, ss, tt, uu, vv, ww and xx. These variables are only calculated in an individual translator at the time it is triggered. So, you have a translator with an incoming message of 90 00 pp. pp is calculating the variable every single time the translator is triggered. Nothing is saved. If you were to put a rule in that says "if pp<50 then pp=20" then every time the translator is triggered with a velocity of less than 50 the pp variable in the outgoing message will be 20. So, you could have an outgoing message that says 90 pp 7F which would mean any time the incoming message had a velocity under 50 the outgoing message would be 90 20 7F (well, whatever the decimal translates to hex. I'm at my day job and can't remember off the top of my head). You can have multiple translators all using pp and they do not interact. So you can also have a translator that says 90 00 pp with a rule that says "if pp>50 then pp=30" with its own outgoing action. You can also mix variables so "if pp>50 then xx=30" with an outgoing action of 90 00 xx.

Global variables, however, are saved as changes are triggered across translators and presets. These are made up of variables beginning with g, h, i, j, k, l, m, n and in the mac version for now y and z. These values can range anywhere from g0-g9 and ga-gz for all of them (h0-h9 ha-hz, etc.). These variables can be set by any translator and will carry onto any other translator. So, as an example, you can have a trigger that sets g0 to 1 and then back to 0. If g0=1 then some translators might not trigger (if g0!=0 then exit rules, skip outgoing action). This would be used as a shift, and would be the most basic method of using global variables.

For what you want to do you're going to want to use a whole buncha stuff including timers, presets and multiple translators. There are quite a few ways to do what you're talking about but I believe this method will instruct you in how to set variables and use multiple functions of MIDI Translator Pro together to get the most out of your controllers. Before we get to that I just want to make sure that what I've written so far makes sense. If it does we'll keep going, if it doesn't I'll explain more in depth.

Also, I'm going to start working on an actual manual forMT Pro, I think, to give users actual explanations of the sdtuff I had to fight with for a long time.

JuanSOLO

2012-01-26 18:44:35

Yeah all of this is helpful and greatly appreciated. I understand all these concepts and are using some of them, especially setting up presets i.e. MODES, Mode 1, Mode 2, and how these work together, like 'MODES preset' switching between Mode 1 & 2, and having all my working translators in there.

I struggle with the globals and rules because I am coming from a M4L background on using conditionals. I haven't tried this basic globals "shift function" yet. But my intention is that most of my APC40's default functions will be shifted as opposed to the Modes being shifted. For example, I generally want to engage a mode by simply pressing a Track Select button. So Track 1 will be like a Drum/Step sequencer mode, Track Select 7 & 8 will be a basic note mode as I described above, where there is no "note off" message when releasing a button, but only 1 note on message is outgoing in the mode, and pressing a different button disengages the previous not while activating the current one. Like a huge toggle matrix where only 1 note can be played at a time, AND the modes "remember" which note is pressed and the LED feedback shows that.

I dont wanna get too specific about what my goal is, because I feel like it boggs down the learning process, for me it's more important to learn the LED feedback memory thing between modes in some easy to understand/generalized manner, and thats why I have come up with what I did in my original post.

However I will give you some basic breakdown of some goals so you can understand where I am coming from. I want 8 Modes selected via Track Selection buttons, AND the Track Selection buttons select the Track to focus as well. Mode 3 is currently my most abused Mode. It is for a Reaktor Plug called Vectory. Not sure if your familiar with it, but basically on my APC40 I have 2 4x4 matrix blocks side by side. 1 red block, 1 yellow. The RED 4x4 matrix selects a 2 bar breakbeat, the YELLOW 4x4 matrix selects a mash up sequence. These buttons send out a "note on" that Vectory responds to in a monophonic manner for each 4x4 matrix. One of the things I cant figure out is the LED feedback. I want to press a Red button and it stays yellow, until I push another red button and then IT goes yellow and the previous one goes back to red. I also want these pressed LED's to stay that color when switching back and fourth between modes, UNLESS I change them.

I can get all of the Modes working pretty well and doing what I want them to, except for better LED feedback. Right now buttons only change color when pressed and upon release they go back to their original color. I want them to provide visual feedback show which one is active.

THANKS for responding and looking forward to more. I have posted up a video here, showing something a little different, HOWEVER you can see my Vectory Mode pretty well in this footage and kind of get and idea of what I want it to do with the LED feedback. @ 2:13 in the video I switch to this Vectory Mode http://vimeo.com/35278018 ALSO, I have another video I made for Stray at NativeKontrol in the form of a feature request. I'd love to share that with you through dropBox. It shows a similar idea to the Matrix Modes, only with selecting title bars on FX devices, per engaged mode. If you can send me a message at particle808 at yahoo dot com. I will send you an invite to that video.

Thanks AGAIN!

DvlsAdvct

2012-01-26 20:28:13

Alright, then what I would recommend is using timers and global variables in conjunction for your LED feedback. You'll want two timers, one for each part of the grid (using the vektor preset you're discussing), and one variable for each (we'll use g0 and g1 for this example), but those can be replaced with any other global variable (ha...hz, etc.).

So, to start you're going to set a translator for each button with an outgoing message that you already have. In the rules you're going to have this set a global variable. So for the red section, the top left corner button will be g0=0, the one to the right will be g0=1, then g0=2, etc. etc. The rule will literally say just that. That will set your global variable based on the state of the last button pressed. When you exit this preset and reload another one it will still be there. Keep in mind not to reuse this specific variable anywhere else in the preset as it will over ride.

All LEDs are going to be set by a timer that we'll called Red State LED.

Now there are a bunch of ways you can code the LEDs. The cleanest way would be to use a local variable and define the range of just the buttons that will trigger the red state timer. This would look something like

Code: Select all

Translator Name: Red State LED
Incoming Message: 90 xx 7F
Rules
if xx<1 then exit rules, skip outgoing action
if xx>4 then exit rules, skip outgoing action
Outgoing Action: Timer Red State LED 0ms
You would use this to define the range of the buttons that can be used to trigger the LED. You'll need to convert the hex code to decimal for rules, as the rules need decimal values, but you can do that in the Help menu under the translator. You'll want four of them to put this together, for each row of the grid.

From here you'll need a translator to signal what the timer will send out. I would do this with 16 translators, one for each button, and the outgoing action dictating the value of every button in the range. Assuming that red is velocity 1, yellow is 2 and off is 0, it’d look something like

Code: Select all

Translator Name: Red State LED Trigger
Incoming Message: Timer Red State LED
Rules: if g0!=0 then exit rules, skip outgoing action
Outgoing Action: 90 00 02 90 01 01 90 02 01 90 03 01 90 04 01….
And then you can just duplicate each time and change which one turns yellow and reverse the other one to red.

You then create a translator that triggers the timer on activation of the preset

Code: Select all

Translator Name: Activate LED
Incoming Message: The Current Preset is Activated
Rules: None
Outgoing Message: Timer Red State LED
It’s a lot of code, I know, but this is the cleanest for a Bome preset. Does it make sense?

JuanSOLO

2012-01-26 20:43:20

YES, totally makes since. I will try this out when I get home from work. I'm sure I'll have more questions. AND, I'm not afraid of a lot of code at this point, I just want it to be manageable. Currently I have made a tangled web of a template.

THANKS!

DvlsAdvct

2012-01-26 20:55:06

I totally understand. Feel free to respond to this thread with questions in the future as I'll directly get alerts in my email.

JuanSOLO

2012-01-27 03:52:18

Code: Select all

Translator Name: Red State LED
Incoming Message: 90 xx 7F
Rules
if xx<1 then exit rules, skip outgoing action
if xx>4 then exit rules, skip outgoing action
Outgoing Action: Timer Red State LED 0ms

OK, right here I am using xx, where xx is the CC number, and 7F is the velocity. For the APC40, LED's are set by velocity.
0-off
1-green
2-green blink
3-red
4-red blink
5-yellow
6-yellow blink

so I am confused why we set rules for xx<1 and xx>4. The CC numbers coming in at xx are like 35-39.
So is this meant to be for the velocity? Unless we are just listening for the buttons CC number?

Also does this mean
You'll want four of them to put this together, for each row of the grid.
I am making 4 of these translators in this particular "mode" preset for each row where
row 1 is 90 xx 7F
row 2 is 91 xx 7F
row 3 is 92 xx 7F
row 4 is 93 xx 7F

is that right?

DvlsAdvct

2012-01-27 04:26:43

the 35-39 is in hexadecimal, correct? Not binary. It needs to be in binary for rules. 35 in Hex is 53 in binary

if xx<53 then exit rules, skip outgoing action
if xx>58 then exit rules, skip outgoing action

and the outgoing action is the timer.

You're going to have four timer translators. The first one will read out (assuming the channel for the row is all 90... it could be something different so just fill that in as needed)

Code: Select all

Incoming Message: Red State LED
Rules
if g0!=0 then exit rules, skip outgoing action
outgoing message 
90 35 05 90 36 03 90 37 03 90 38 03
Make sure you have the g0 variables set by each button in the grid for the red section. Now you'll have four timer translators that look like the above, and you should be able to update each light individually.

That make sense? Worst case I could do a quick draft together to see if that'd work for you as well.

JuanSOLO

2012-01-27 04:46:04

The attachment shows where I am at, which is obviously lost.

I am on the phone with my wife, so I havent really read your latest post. I will soon.
Attachments
APC40 MODES.bmtp
(7.84 KiB) Downloaded 732 times

JuanSOLO

2012-01-27 04:59:27

OK, so now I got some feedback, but not quite what I was expecting, I got colums changing colors. hmmm, I feel like I almost got this figure out.
Sorry about the wife stuff, we just sold our house and have been living apart for a year and a half, yet I wanted to respond ASAP.

DANG, this almost makes since

DvlsAdvct

2012-01-27 05:12:54

God you're just so damn selfish :p Totally understandable, some things, even family, takes priority over MIDI.

Regardless, since I left my girlfriend in front of Family Guy (hopefully she doesn't notice I'm gone), I just reuploaded some changes to the drop box.

I was unsure of the specific channel setup of the individual columns. So each column has its own MIDI channel (1-8) with the same note message. I set the appropriate global variables for all of them and added a few lines. Being that each LED translator has 4 entries I duplicated them 4 times with the same global variable so they all light up. What I would do, to clean it up, is have a preset for the left half and the right half of the grid, just so the code is clearer when you're looking at it, and managing the variables makes more sense.

I uploaded it to the drop box we set up, but I'll attach it here as well.
Attachments
APC40 MODES update.bmtp
(9.05 KiB) Downloaded 698 times

JuanSOLO

2012-01-27 05:43:22

OK this WORKS!!! see attachment.

Thanks for the help, now I am just trying to realize why it's working.
Attachments
APC40 MODES.bmtp
(9.16 KiB) Downloaded 703 times

DvlsAdvct

2012-01-27 05:47:12

Well, where are you getting lost? (at this point I'm going to get ready for bed)

Just jot down where things aren't making sense and I'll try and explain them.

JuanSOLO

2012-01-27 06:52:48

OK, I got 2 4x4 grids working, now for the bottom row. This is where I want the buttons GREEN unless pressed, then I want that button RED.
I seem to be off here, maybe something to do with hex vs. binary, not sure where that is in the help menu?

I am posting the current template. I may figure this out before I got to sleep, maybe not.

THANKS again!!!
Attachments
APC40 MODES.bmtp
(15.3 KiB) Downloaded 683 times

JuanSOLO

2012-01-27 07:25:02

AWESOME, got the LED feedback in at least 1 mode. I attached the template.

This is great, now I am getting it! Thanks SO MUCH!!! more questions soon, I am sure.
Attachments
APC40 MODES.bmtp
(16.69 KiB) Downloaded 660 times

JuanSOLO

2012-01-27 16:29:15

OK, so far with what I have posted I have my 1st Mode for my Vectory Plug.

If I haven't mentioned it before, I am using the NativeKontrol apC-CL3 in conjunction with my additional Bomes features. Eventually I may quit running the apC-CL3, but for now I like the DrumMode and step sequencer too much to make my own.

So what I have noticed is that switching to my Vectory Mode, the LED's do not populate till I push a button on the matrix. I am thinking I need a way to initialize the Matrix upon activation of the Vectory Mode preset. Not sure what the best approach would be.

DvlsAdvct

2012-01-27 16:55:57

All of your LEDs are set on global variables which are set by triggering timers.

So, what you are going to do is set a translator that says

Code: Select all

Translator Name: Activate LED
Incoming Message: On Activation of This Preset
Rules: none
Outgoing Message: Yellow LED timer
Now when you trigger the preset the LEDs will trigger based on the stored global variable.

JuanSOLO

2012-01-27 17:10:28

NICE! I knew it was something like that, but I had no idea how to do it. I will try this when I get home from work.

I'm really excited to start grasping this, thanks so much.

JuanSOLO

2012-01-28 01:28:36

OK so I tried adding the translators you suggested for activating the LED's. However it only seems to be activating the outgoing "timer" of the section that was pressed last. I posted the latest version.

ALSO, in trying to think ahead, I would like to put the APC40's matrix in default mode, ONLY when any Track Select button is pressed. When it is released it will activate the Mode for that particular Track Selection button.
Attachments
APC40 MODES.bmtp
(22.94 KiB) Downloaded 637 times

JuanSOLO

2012-01-28 23:11:23

OK so here's my latest template. It's ment to work with NativeKontrols apC-CL3. I only the NativeKontrol stuff for the Drum Sequencer, and thats what the "Drum Mode" is all about. So when you see the 'DRUM MODE SWALLOW' it is nullifying all the drum pads when the 'DRUM MODE' is NOT activated.

When Track 1 Selection is pressed a call is getting sent to the APC40 saying "press Shift+Clip Stop 3," and when released it's telling the APC40 to release Clip Stop 3 then Shift. This engages Drum Mode on the apC-CL3 template.
When ALL other Track Selection buttons are pressed, a call is getting sent to the APC40 saying "press Shift+Clip stop 4," and when released it's telling the APC40 to release Clip Stop 4 then Shift. This engages User Mode on the apC-CL3 template giving me an opportunity to override with my custom Modes.
In the "MODE SWiTCH" preset I am making the "shift+" calls for every button. I was thinking there should be a way to do that once for Track Selection 1, and once for all the others since all the others are doing the same call. Not sure how to set up that rule. It works as is but I am thinking I could simplify it somehow.

Everything seems to work as expected so far. The only problem is engaging Vectory Mode. The LED's dont update properly, they only update for the last section of color pressed or something?
I really wanna fix this but I am stumped.
Attachments
APC40 MODES.bmtp
(97.8 KiB) Downloaded 669 times

DvlsAdvct

2012-01-28 23:47:53

I've been seeing these, not ignoring you. I'll hopefully have an answer for you before the end of the day. Just haven't been home.

DvlsAdvct

2012-01-29 02:22:13

For some reason the LED signals are all set with the Thru option. Go through each translator and check/uncheck the Stop Processing with this Translator box. Thru should go away. Let me know if that works.

JuanSOLO

2012-01-29 18:37:43

For some reason the LED signals are all set with the Thru option
Not sure exactly what this means in Bomes. I understand Midi Thru, but what are you looking at here to determine LED signals are set with the Thru Option?

I tried turning on and off the Stop Processing button for every translator in my Vectory Mode, still not luck. hmm

DvlsAdvct

2012-01-30 00:02:06

Alright, I think I got it.

What we forgot about was a translator to have the red and green sections light up if g0 was not in their range. I added it in to the preset, attached below. I have an idea for another method of setting up the LEDs which might be easier to manage in the future. Have an individual translator for each button tied to the same timer (with the g0 variable as is). There would be a rule for each LED dictating what color it would turn on that timer, so if it's off it's red and on its yellow, or off it's green and on it's red, etc. etc.. I can try and throw that together so you have have an alternative which might be easier to manage in the future.

Regardless, here's what I put together. Tell me if it does what you want.
Attachments
APC40 modes LED update.bmtp
(98.21 KiB) Downloaded 675 times

JuanSOLO

2012-01-30 02:22:21

This sort of works, but now instead of updating 1 section, it just updates 2, yet those 2 vary upon what was previously activated.

I found what you added, the
if g0<16 then exit rules, execute Outgoing Action
and
if g0<32 then exit rules, execute Outgoing Action

but there is only these 2 correct? Why not 3? maybe something to do with g0<0 when there is no less than zero?

So I just added another translator for the Yellow State in Vectory Mode with a rule
if g0<0 then exit rules, execute Outgoing Action
It almost works but not really. Should I bump all the global variables 1 increment, so there is no g0=0. In other words Clip1 translator would start at g0=1 instead?

DvlsAdvct wrote:I have an idea for another method of setting up the LEDs which might be easier to manage in the future. Have an individual translator for each button tied to the same timer (with the g0 variable as is). There would be a rule for each LED dictating what color it would turn on that timer, so if it's off it's red and on its yellow, or off it's green and on it's red, etc. etc.. I can try and throw that together so you have have an alternative which might be easier to manage in the future.
This sounds GREAT!

DvlsAdvct

2012-01-30 02:55:21

Yes, I forgot about that. You actually need a timer that says g0=0 and one for the yellow state for g0>15 like the others I put in. I spaced on that. I'll get it together soon so you can see it.

JuanSOLO

2012-01-30 04:13:53

DvlsAdvct wrote:Yes, I forgot about that. You actually need a timer that says g0=0
How does that work?

DvlsAdvct

2012-01-30 05:50:35

I was typing that on my phone, and I think I overthought it.

What you need to add, mainly cause I forgot, is a Yellow Timer translator that sets everything to a static value if g0>15.

So essentially you'll take the first yellow timer entry (g0!=0) and duplicate it. Change the rule to read as

if g0>15 then exit rules, execute outgoing action

and set all of the LEDs to be yellow, just by changing the first entry in the code from 05 to 03. Make sense? The g0=0 won't be needed cause g0=0 actually gives you an LED value, which I forgot. :)

JuanSOLO

2012-01-31 01:44:22

DvlsAdvct wrote: and set all of the LEDs to be yellow, just by changing the first entry in the code from 05 to 03. Make sense? The g0=0 won't be needed cause g0=0 actually gives you an LED value, which I forgot. :)
you lost me here. Set all the LED's I "want" to be yellow, or ALL of the LED's to yellow? First entry in the code, not sure which entry you are referring too.

DvlsAdvct

2012-01-31 03:51:01

It was easier to just throw this together. If I have time I'll try to put together a more direct LED control scheme, but I'm going out of town this weekend and will need to have "family" time... yay?

So yeah, this should get the yellow LEDs to light up. This working how you want?
Attachments
APC40 modes LED update.bmtp
(98.46 KiB) Downloaded 686 times

JuanSOLO

2012-01-31 04:29:54

Yeah, this is what I did...i think, but I am still getting strange behavior in Vectory mode, even whit your attachment.

All other modes LED's update as expected, it's just the Vectory Mode that seems to be missing something.
Does this work for you?
For example if you activate the Vectory Mode preset with your mouse, do you get 2 4x4 grids, one yellow with a pressed red button somewhere, and one red with a yellow button pressed somewhere, plus the bottom row that is OFF except for what has been pressed, which should be green?

DvlsAdvct

2012-01-31 13:48:34

Ah, I see where the confusion came in.

Try this one out. The Green LEDs aren't coded perfectly, but I have to get myself together for work and this would have bugged me all day.

J
Attachments
APC40 modes LED update.bmtp
(97.95 KiB) Downloaded 636 times

JuanSOLO

2012-01-31 17:55:05

I tried it this morning before walking out the door to work. The 2 4x4 grids update perfectly, not sure about the green row. HOWEVER, I didn't even get a chance to look at the actual template, I'm sure I will have more questions later.

Thanks for being so helpful with all of this.

DvlsAdvct

2012-01-31 18:25:58

Not a problem at all.

I have ideas for the green section, I just didn't have time before I ran out to figure it out. Let me put some thought into it. Essentially, you want the green buttons to light up when pressed, but turn off when released? Or stay on and then turn off if you leave the preset and come back?

JuanSOLO

2012-01-31 19:07:35

the green row is used for selecting "banks" of samples, kind of like a preset. So essentially it works just like the 4x4 grids, all buttons are "off" except for the bank that is selected, which is green.

For a while I thought about the whole row being green except the selected bank would be red, but visually off and selected=green seems to provide better visual feed back, and contrast.

DvlsAdvct

2012-01-31 20:31:09

Right. And you want it to restore that bank state when it is reactivated?

JuanSOLO

2012-01-31 20:34:48

most definitely!

DvlsAdvct

2012-01-31 20:49:01

Oh, okay, then we just need to clear two things out, which I can do when I get home, and that'll work exactly as you want.

JuanSOLO

2012-01-31 21:05:01

awesomeness!

DvlsAdvct

2012-02-02 01:15:47

How's this work?
Attachments
APC40 modes LED update.bmtp
(97.73 KiB) Downloaded 644 times

JuanSOLO

2012-02-02 16:05:12

I tried it for a few seconds on my way out this morning. TOTALLY WORKS! Thank you.

The past week I have polishing some work inside Ableton. Next week I will be putting this template through it's paces, and thinking what I want to try adding next.

DvlsAdvct

2012-02-02 20:44:02

Awesome. Please feel free to come back with questions. Just keep building this thread, as I'm sure people can use it in the future.

JuanSOLO

2012-02-02 21:41:18

OH yeah I will be asking plenty of questions once I get this situated and tested.

I still wanna figure out how to get into default mode. I was thinking about using the Master Select and when pressed you'd see the clip matrix/default mode. I'm just not sure I want to use the Master Select.

Also I will be wanting to do some stuff with the device control buttons, knobs and Track Control buttons and knobs.

Right now I am slimming down some of my Live set and contemplating what I want to work on next with this Bomes template.

DvlsAdvct

2012-02-02 22:48:17

Well, keep in mind you can use a preset to get into Default Mode, and can use a keyboard command for it, to switch between the two modes.

Once you know what you need let us know. I'll be keeping my eyes open, and might even have to get my hands on an APC40 cause this stuff looks cool regardless.

JuanSOLO

2012-02-17 05:30:09

OK, so now I am wanting to do something kind of complex.

In my Live, there is a logic that goes like this.
On every Track there is a Device 1, which is usually a SynthRack, or some kind of VST Rack. This is followed by 4 FX Racks.
ALSO, I have a DrumRack and each cell follows this logic, there is the Device 1 (usually a Sampler), then it's followed by 4 FX racks

I am also using the apC-CL3 template from NativeKontrol, which offers a 'Device Lock' feature for the Track Control Knobs. This gives you the opportunity to use 2 blue hands. One locked to the Track Control Knobs, and the other can be used for the Device Control Knobs yet you can move it around to other devices.

I want my APC40 to do this:
Upon pressing a Track Selection button, OR hitting a DrumPAD on my APC40
1. The Track Control Knobs lock to the 1st Device (second blue hand)
2. Then the Device Control blue hand selects the title bar of one of the following 4 FX racks. (pending on which one was selected previously, like it has memory of where it left off)
3. The 4 Device Control Buttons will toggle between the 4 FX Racks. CLIP/TRACK, DEVICE ON/OFF, LEFT ARROW, RIGHT ARROW, select FX Device 2, 3, 4 and 5.
4. When Selecting the FX Racks with these buttons, I want the FX Rack to OPEN and CLOSE so only whats being controlled by the Device Control knobs is in view and all other FX racks are closed. (done by sending a "shift +" or - keystroke. Actually the - keystroke is the only one that seems to be nessicary because when selecting a device via midi mapped title bar, it automatically opens from a closed state.)

I can get all of this to work, but I cant get the "memory" part working, and my previous attempts are kind of buggy.

Right now I want to focus mainly on the DrumCell part.

SO
I go into DrumMode by pressing Track Selection 1.
My APC40's Matrix lights up with my DrumPads via the apC-CL3 Template.
When I hit the Kick Pad, I want the above to happen, or the snare pad, or any of the 16 pads.
So basically I need to set up a Bomes Preset for each
1. Kick Device and FX
2. Snare Device and FX
3. Hat Device and FX
etc etc.
These will be activated within the 'Drum Mode' preset. So when 'Drum Mode' is activated the pad translations within it, will activate/deactivate the Kick Device and FX, or the Snare Device and FX, and so on.

So in these 'Device and FX' presets I was thinking something like this:
Translator 1 Lock
incoming message, when preset is activated
outgoing message, 90 59 7F (the SEND B button to activate Track Control blue hand lock,) set to specific ports Midi Translator Pro Virtual Out 1.

Translator 2 Lock
incoming message, when preset is activated
outgoing message, 80 59 7F (the SEND B button release to activate Track Control blue hand lock,) set to specific ports Midi Translator Pro Virtual Out 1.

Translator 3 Select FX Rack
incoming message, when the preset is activated
rules (some kind of global for memory sake??? for example g9=0)
outgoing message 99 (a different number for each title bar for the 4 different FX Racks) 7F

ALSO somewhere there needs to be an 'UNLOCK' Translator that sends a 90 59 7F and then a 80 59 7F, emulating the SEND B button pressing to unlock.
AND when the Device Controls blue hand moves, a - keystroke needs to be sent, to close the device that is moving from.
There probably needs to be some kind of initializing preset, so when I open the Live Set/Bomes Template, maybe the FX device blue hands are set to something default.

If the Device open and close is TOO complex I could live without, but the memory and Device Lock are essential. However I would like to see ALL of this working.
Any advice on how to set this up?

Right now I have attached a Bomes Template thats kind of working but I realize it's difficult to understand without the Live Set file.
Let me know if I need to share that to make since.
Attachments
APC40 MODES.bmtp
(115.82 KiB) Downloaded 671 times

DvlsAdvct

2012-02-17 23:09:27

Wow, this actually looks like fun. :p

I'm going to take a look at this during the weekend. I'll see if I can grab my friend's APC40 so make this a little easier.

DvlsAdvct

2012-02-21 16:39:14

I've been putting some thought into this and hope to be able to get some work into it this week. REALLY crazy week coming up, but I should be able to swing some details.

Regardless, if you want your state remembered you need to set a global variable for it. You need to make sure that the states that overlap are given the same global variable to make the memory process work. So, in your example, you want it to remember the FX state that was open for each specific sound in the drum rack. To do this you need to set the same Global Variable for each FX state (0, 1, 2, 3) for each FX state. You should set this to the translator that opens and closes each FX rack.

So once you have that set you can set the translators up in different ways. The cleanest to set but hardest to edit later is all tied into one translator

Code: Select all

Translator 1: FX On Load
Incoming Action: When Preset is Activated
Rules:
if g9==0 then xx=1
if g9==1 then xx=2
if g9==2 then xx=3
if g9==3 then xx=4
Outgoing Action: 90 xx 7F
And what this will do is trigger the opening of the individual FX rack when the sound is activated in Ableton.

As far as opening and closing the FX windows, isn't there a way to toggle this with MIDI instead of key strokes like "ctrl +"?

JuanSOLO

2012-02-21 17:04:30

Without my APC40 plugged in, this is what I it looks like. When a kick pad is pressed, the "EKS Rack" gets selected, then locked to the Track Control Knobs. THEN, it jumps to one of the following FX racks, and opens it.

Image


Tonight I will be doing more work on this trying to figure out the memory, and and the closing of devices.

JuanSOLO

2012-03-07 18:49:36

OK, so far I have most things working as I want. As soon as I refine some adjustments I will post the template as is, plus a Live Set template.

However, right now I am utilizing the NativeKontrol apc_CL3 template, mainly for the killer drumMode and sequencer. I want to replace this method by creating my own step sequencer. Any tips on where to get started with that?

DvlsAdvct

2012-03-07 19:56:49

I have no idea if step sequencing is even possible to do this in Bome. If it is it's going to be extremely intensive, and might require API programming or something, which I have no knowledge of. I can pass this on to Florian to get his input, though.

JuanSOLO

2012-03-07 20:28:17

yeah, I have a feeling it might take more than Bomes.

Nevertheless, I will keep this thread going with some other things.

DvlsAdvct

2012-03-07 20:46:46

Definitely. Any more questions don't hesitate to bring it here. Also, if you get it working please post as much info as you want so others can see it. :)

JuanSOLO

2012-03-07 21:03:14

I pretty much got the opening and closing of devices working, PLUS the device memory pending on cell/track selection.

What I dont have worked out yet is initalizing the template, or the APC40? I know I need to kind of initialize the entire thing so everything starts at kind of a default place, but I have some things I need to figure out, or can figure out, and then maybe questions.

Should initialization be done with timers?
Is there a way to initialize globals?
For example, I want a default starting point that says, 'all of these buttons have been pushed, everything is in position ready to play'

DvlsAdvct

2012-03-07 21:11:56

Well, you can create an [init] preset with translators that all relate to "On Project Load" which is a special option for incoming message. In the rules just set all the global variables you want and they will be set as such when you open the new presets as you're using it.

JuanSOLO

2012-03-07 21:38:19

COOL, thanks!

JuanSOLO

2012-04-06 23:59:33

How do you set the matrix back to it's "default" state? As in refreshing the LED's in default

DvlsAdvct

2012-04-09 15:35:15

So you want a preset that loads everything back to its original form. I've found a great way to do this is to create a preset that has a series of translators that set everything exactly to what the default states are. Set all your variables, and trigger all of your timers so the controller looks like it should. This preset can even trigger whatever states you want back in your software so everything is lined up.

In your initialize preset, or whatever preset you have to control triggering all of your other presets, set an "activate selected preset" translator for a "Return to Default" preset. WIthin that preset, start with a timer called "Deactivate" on a 50ms delay. Every other translator should be set as "On activation" and have every variable, preset action, LED state trigger within. The last translator have on the timer "Deactivate" and have that translator deactivate the preset.

Make sense? Need me to create any examples?

JuanSOLO

2012-04-09 16:18:35

I want a preset that I trigger, and the APC40's Matrix goes back to default mode, i.e. launching clips. Like it does out of the box.

For example I want to push the "Master Track" button and it goes back to clip launching mode for the Matrix. How do I do that so the LED's update correctly.
I ended up abandoning the apc-CL3 template, and just making my own Bomes template. So I dont have a mode for clip launch, or a way to reset that state.

ALSO, I still always feel a bit confused on ports, the router, and what this means in Ableton's preferences.
I understand in Ableton's midi prefs that if I tick IN and OUT for Track and Remote on Bomes Midi Translator 1 that I can use that in Ableton for recording midi to tracks and controlling parameters.
Right now, in Bomes I have.
Midi In Port, APC40
Midi Out port, APC40 and Bomes Midi Translator 1
the Router is connected as
APC40 in>Bomes 1 out
Bomes 1 in>APC40 out

I'm not certain of what these paths are connecting, their relationship to each other, why things loop back on themselves sometimes, etc.

DvlsAdvct

2012-04-09 17:43:52

Oooooooh okay. I misunderstood. Can you just provide the signals that trigger APC40 mode and the open mode you've coded with Bome? I think we can figure this out. You are going to need a preset to switch between the default mode and your advanced mode. You'll also need a preset for the default mode with only two translators, one for in and one for out, and each with incoming and outgoing signals as xx yy zz. This will allow the presets to act as passthrough.

Now you need to select a command that turns these presets on and off, in tandem with your advanced mode. This making sense? You may also need to set a preset tied to your advanced mode forcing the timers and variables to be pushed back to the APC40.

What the router is showing is that anything coming into Bome from the APC40 is, by default (and unless otherwise noted in the translators) sent to Bome MIDI Translator 1 and anything sent from Bome 1 goes to the APC40. Make sense?

JuanSOLO

2012-04-10 01:35:08

This is where I am at right now.
It's not very refined. Kind of a mess after ditching the apC_CL3 stuff/
Attachments
APC40 MODES V12.bmtp
(226.37 KiB) Downloaded 661 times
APC40 MODES V11.bmtp
(230.68 KiB) Downloaded 657 times

DvlsAdvct

2012-04-10 16:10:04

Hi Juan

I will take a look at this tonight after work. :) For simplicity's sake, which preset are you more concerned with (as I can't open them while at the office)

JuanSOLO

2012-04-10 16:38:30

I basically want to turn off ALL of the other "modes" presets and have a default APC40 matrix mode.

DvlsAdvct

2012-04-11 02:08:08

Hi Juan

I totally understand what you're looking for. I just need to know what message the APC40 needs to receive to send it into User Mode and APC40 mode, and how you want to trigger it (from a button or a keypress). From there I can put together the logic for it, but those messages matter.

I don't have access to an APC40 for a few days. Once I have it I can figure it out on my own, but that might have to wait for the weekend.

JuanSOLO

2012-04-11 04:15:34

Its cool. I was gonna make the Master Select button be the trigger.

DvlsAdvct

2012-04-11 04:27:27

Okay.

I'll have something for you in a day or two that'll do what you want, with an explanation as best I can. :)

JuanSOLO

2012-04-11 04:38:28

You are AWESOME!

DvlsAdvct

2012-04-11 05:03:23

Give this a shot for a start. I created a Mode Switch preset, and an APC40 Mode preset. I don't have the APC40 in front of me so I can't trigger the incoming messages for preset changes, obviously, so I can't test, but if you give this a shot it might work. The idea is you need to make sure that the first two translators are the Master Select button in the APC40 mode and the last two are the Master Select button in User Mode. If that works then there should be only a few steps left to make this work flawlessly. Let me know if there are any problems. :)
Attachments
APC40 MODES V11.bmtp
(232.67 KiB) Downloaded 656 times

JuanSOLO

2012-04-11 14:45:13

Awesome, I will try this after work.
THANKS!

JuanSOLO

2012-04-12 03:19:30

This sort of makes since, and at the same time I'm confused.

I get the deactivation of all other presets and then having a few translators that are xx yy zz and this would pass ALL of the APC40's commands.
But I dont really want to pass ALL of the commands, just the Matrix and the Clip Stops.

I reposted a cleaned up version of my Template and here a breakdown of whats happening.

Preset 1 - APC Always Active.. These are translators that allow everything I want to pass ALL the time. Things like PLAY STOP REC, all the Record Arm Buttons, prety much all buttons outside the Matrix. This preset would ALWAY be on.
Preset 2 - initialize.. This preset has not trigger yet, right now I just mouse click it. However, this preset runs through my Live set, activating globals and closing devices. Eventually it will do more, i.e. set values etc, so it's kind of a work in progress and not totally important right now.
Preset 3 - CLOSE FX DEVICE.. This preset is ALWAYS active. It is used to Close FX Rack upon switching FX racks, so whatever is 'bluehanded' is the only thing open. I was using this a lot more in the beginning, but now I have simplified my Set as well as this template so I am not currently using it
Preset 4 - MODE SWITCH.. This preset handles all the mode switching. For example if Track Selection 2 is pressed, Track 2 is selected, when it's released 'Vectory MODE' is activated.
Preset 5 - DRUM MODE. is different, eventually it will be a step sequencer, but for now it is receiving drum pads. When in Drum Mode if a pad is hit, it will activate presets KICK FX, SNARE FX, etc. pending on which pad is hit.
Preset 6 - VECTORY MODE.. Vecotry Mode handles all the Matrix Translation for my Reaktor Vectory Plug. It also Translates the top 4 Device Control Buttons too highlight title bars for the 4 FX racks on that Track and 'blue hand' them.
Preset 7 - FM8 MODE. This Mode turns the Matrix in to a big program change switch for my FM8 Plug. It also Translates the top 4 Device Control Buttons too highlight title bars for the 4 FX racks on that Track and 'blue hand' them.
Preset 8 - DECK MODE. This mode is a little different. I am using Track Selection 4 and 5 to turn the Matrix into DECK MODE, but DECK MODE is spread across 2 Tracks, so it also Activates/Deactivates DECK FX A or DECK FX B for the Top 4 Device Control buttons to 'blue hand', pending on which track is selected.
Preset 9 - MOOG MODE. This Mode turns the Matrix in to a big program change switch for my MOOG Slim Phatty through the External Instrument Device. It also Translates the top 4 Device Control Buttons too highlight title bars for the 4 FX racks on that Track and 'blue hand' them.
Preset 10 - FNGR MODE. - This mode makes the Matrix translate note on/off messages that are sent to The Finger which resides on a return Track in Ableton. BUT when it comes to the 'blue hand' I have to make it jump to the Return Track it sits on NOT Track 7.
Preset 11 - STUTTER MODE. This is like a sub mode for the FNGR MODE, it just changes the LED's and the range of notes translated by the Matrix and it is activated by pressing the Activator button on Track 7. The 'blue hand' works identically as FNGR MODE.
Preset 12 - 19. These presets are only activated/deactivated in DRUM MODE. They translate the Top 4 Device Control Buttons to 'blue hand' FX devices pending on which Drum Pad is hit.
Preset 20 - 21. These presets are only activated/deactivated in DECK MODE. They translate the Top 4 Device Control Buttons to 'blue hand' FX devices pending on which Track is selected.

Most of my other buttons on the APC40 such as Activators, Solos, Record Arm, Detail View - Metronome, Tap Tempo, Shift, Bank Select, Vol Faders etc... are MIDI MAPPED in Ableton to do something specific, OR do their default behavior ALL of the time. Thats what the 1st Preset is for, the APC40 ALways Active.

What I need is a "Default Matrix Mode" preset, that when Master Select is pressed ONLY the APC40 Matrix goes back into clip launching mode, and the LED's are updated.

So far everything EXCEPT the Default Mode is working well, HOWEVER I'd really appreciate the once over of this Template and maybe ideas of how things might work better?
I am still having trouble with the VECTORY MODES green LED's updating properly too. They are correct once I press one, but they dont update correctly upon opening my Live Set and geting right to it. They are always ALL GREEN. I want only one green button showing, and the rest off. The one Green showing represent which Sample Bank I am in.

Thanks DvlsAdvct for all your help so far! I am learning, but I got more to learn for sure.
Attachments
APC40 MODES V13.bmtp
(213.59 KiB) Downloaded 683 times

DvlsAdvct

2012-04-13 16:51:50

I'm hesitant to say we can JUST activate the grid into default mode and not the rest of the controller. Not to say it can't happen, just not sure right now. It might have to be an on/off thing for the entire unit. I'm waiting to get my hands on one so I can screw around with it.

JuanSOLO

2012-04-17 00:13:56

any luck?

DvlsAdvct

2012-04-17 18:11:57

Hey Juan

Sorry for not getting back. I should be picking up an APC40 tonight from a friend so I can test this out. Hopefully I should have an answer for you before the end of the week. Just to make my life a little easier, can you send me any APC40 documentation you might have that would help? As an example, what messages are used to change modes.

Thanks
J

JuanSOLO

2012-04-17 20:00:49

I figured out a semi workaround for getting the Matrix into default mode using the Master Select.

When the Master Select is pressed, all other "modes" presets, get deactivated, AND a translator is set up to emulate pushing "shift" is sent to the APC40 only.

When Master Select is released, it turns on the "Default Mode Preset",
which has a series of Translators that have incoming 'activate this when current is activated', that turn off all the LED's
AND the last Translator with 'activate this when current is activated', emulates a "shift" button release sent to the APC40.

I'll post the template when I get home

DvlsAdvct

2012-04-18 17:21:07

Well, I have an APC40 at my desk now, so just upload the preset and I can take a look at it.

:)
J

JuanSOLO

2012-04-18 17:32:47

nice!

DvlsAdvct

2012-04-21 19:56:47

Yo dude, you gonna upload that preset? :p

JuanSOLO

2012-04-21 20:21:31

Sorry, spaced out a bit.
Attachments
APC40 MODES V14.bmtp
(218.61 KiB) Downloaded 648 times

DvlsAdvct

2012-04-21 20:33:07

Alright, I'll take a look today and hopefully get something sorted by tomorrow night. :)

DvlsAdvct

2012-04-22 21:33:04

Hey Juan. so I loaded up the preset and I'm screwing around with it. The APC40 is so pretty with all the lights :)

So for Vectory Mode, the big issue you said you were having was the LEDs updating properly on load. I added a translator in the SHIFT FUNCT ON preset to set the global variables by default to 0 for g0 and g1, and 1 for g2. Now when it loads those variables are set by default appropriately so when you select that mode the timers know what to set. :)

As far as default mode, I'm getting the master button acting as a toggle for the Default Mode, and everything seems to work fine for that. One weird interaction I'm getting is the LEDs for Deck A FX, Deck B FX, Moog FX and Mash FX are not updating the numbered LEDs properly. I would recommend taking a look at those, as I can't seem to find the commands to send the on/off. This making sense?
Attachments
APC40 MODES V14.bmtp
(218.68 KiB) Downloaded 546 times

JuanSOLO

2012-04-22 22:07:37

TOTALLY MAKING SINCE, THANKS!!!

mrsdoubtfire

2012-04-23 23:41:20

Hi guys - hope you're good. Reading your posts, I thought you might know the answer to this:

My problem is - that when I twiddle the knob on my APC40 which I have programmed to mimic the computer arrow keys - that knob still controls the pan it is pre set to control in Ableton.

Is there a way I can disconnect this knob from controlling the pan it is connected to?

Cheers!

(Currently - I have the MT output set to 'Bome's Midi Translator 1 Virtual Out' - as per what you said
In Ableton, I have APC40 set as the control surface and ''Bome's Midi Translator 1' as input.)

JuanSOLO

2012-04-23 23:52:20

Try clicking "swallow" for that translator.

mrsdoubtfire

2012-04-24 01:01:38

Screen Shot 2012-04-23 at 23.55.09.png
Screen Shot 2012-04-23 at 23.55.09.png (45.05 KiB) Viewed 283478 times
Screen Shot 2012-04-23 at 23.55.09.png
Screen Shot 2012-04-23 at 23.55.09.png (45.05 KiB) Viewed 283478 times
Cheers

I have tried this - however I think the problem lies in Ableton Midi settings.

In Ableton - Whenever I select 'MT Virtual out 1' as the Midi input (with APC40 selected as control surface) - the APC40's standard mapping shuts off and the unit just goes into a basic non educated midi controller state - my knob to arrow keys still works - but the APC's Ableton Mappin is gone. I have attached a pic of my Ableton and MT midi settings.

Cheers
Attachments
Screen Shot 2012-04-23 at 23.55.05.png
Screen Shot 2012-04-23 at 23.55.05.png (59.02 KiB) Viewed 283478 times

JuanSOLO

2012-04-24 01:44:47

In Live's prefs un click all the APC40 only stuff, for Track ReMote and Sync. Keep the APC40 MTP virtual 1 for Track & Remote. Then use the swallow, that should work.

mrsdoubtfire

2012-04-24 10:54:51

11.png
11.png (47.2 KiB) Viewed 283471 times
Hi -thanks

I've attached a pic of what my Ableton Midi settings now look like.

I have midi swallow check box selected in all my settings in Bomes - and still the message is getting through.

The only way I can stop the message getting through is by selecting 'Bomes Midi Translator 1' as the input drop in the Ableton down menu - but then the APC40 red box disappears and it becomes a non educated midi controller.

Have I missed anything?

Cheers

DvlsAdvct

2012-04-24 15:34:46

You need to set the input and output for the APC40 to be Bome MIDI Translator 1, it's the only way this will work.

If you followed my instructions from the other thread, another idea is to put an exclusion rule into the translator.

So you should have four translators, correct? one for all signals going FROM the APC40 TO Ableton, one for everything FROM Albeton TO the APC40 and then the two translators for keystrokes. That's what we're looking at?

mrsdoubtfire

2012-04-24 21:26:49

Hi - thanks.

So I have made some progress. In ableton I now have APC40 as the control surface and Bome's 1 selected as input and output - and the APC40 red box is still showing in ableton which is great . However - the knob is still controlling the pan on channel 1 - even though I have selected 'swallow midi' in every check box on Bome. Maybe there is a mistake in my routing and the signal is still getting through?

My settings are as per the screen shots attached.
able.png
able.png (34.63 KiB) Viewed 283461 times
bomes.png
bomes.png (136.25 KiB) Viewed 283461 times

DvlsAdvct

2012-04-24 21:37:09

What happens if you deactivate the first translator?

mrsdoubtfire

2012-04-24 23:16:56

A ha

When I deactivate the first translator - the knob stops controlling the panning !

Which is great.

But now - due to deactivating that piece of code, the knob only scrolls up when twisted - rather than going up and down

What does this tell us?!

Thanks again
almost.png
almost.png (167.29 KiB) Viewed 283459 times

DvlsAdvct

2012-04-25 02:18:55

It's because you're using the same knob, which I'm guessing is sending absolute signals, to control a command that needs to be sent as an infinite rotary. This needs to be set up with rules. So you have two translators, one for up and one for down. Found this in http://www.bome.com/forums/viewtopic.ph ... as+endless

Code: Select all

Translator 0: turn up
Options: stop=false
Incoming: MIDI B0 0E pp
Rules:
  gd=pp-ga
  ga=pp
  if pp==0 then exit rules, execute outgoing action
  if gd>=0 then exit rules, skip Outgoing Action
Outgoing: Keystroke: Up

Translator 1: turn down
Options: stop=false
Incoming: MIDI B0 0E pp
Rules:
  if pp==127 then exit rules, execute outgoing action
  if gd<=0 then exit rules, skip Outgoing Action
Outgoing: Keystroke: Down 
Make sense?

mrsdoubtfire

2012-04-25 22:10:04

Thanks so much for your help - with that code, the scrolling is working perfectly and the command is being swallowed perfectly as well!

For anyone who wants to scroll using a non infinite knob with APC40 & Ableton, these screen shots show what I did.

Thanks again

Screen Shot 2012-04-25 at 21.06.44.png
Screen Shot 2012-04-25 at 21.06.44.png (44.82 KiB) Viewed 283451 times
Screen Shot 2012-04-25 at 21.07.11.png
Screen Shot 2012-04-25 at 21.07.11.png (212.31 KiB) Viewed 283451 times
Screen Shot 2012-04-25 at 21.07.17.png
Screen Shot 2012-04-25 at 21.07.17.png (197.71 KiB) Viewed 283451 times

JuanSOLO

2012-04-30 04:49:15

My latest Template is attached.
many thanks to DvlsAdvct for all his input.

It still needs some work, and just a good once over and tidying up.
I added a DrumPad mode by pushing Track Select 1
The Green buttons will work as pads always at a velocity of 100, AND they select the corresponding device in the DrumRack and allow you to toggle the blue hand for that cell using
CLIP/TRACK
DEVICE ON/OFF
<
>
The Yellow Buttons give you 16 ascending velocity pads pending on which Green Button you hit last.
The Red Blinking button is a toggle for the Green Pads. When it is pressed the Pads will not send out note on, but it will select the devices and allow for changing bluehanded FX

Right now my MAIN issue I want to work out is when using the BANK SELECT up or down to move the red box. If I am in any mode other than Default Matrix Mode, the matrix LEDs get replaced to what clips are getting focused in the red box. In all modes except default, I do not want this to happen.

Things I need to do:
Fix the BANK up down red box issue when in any of the modes besides 'Default Matrix Mode'
Make all Buttons and Knobs behave in their default function while holding Shift.
Decide if I want to actually use the OPEN CLOSE device feature so only whats blue handed is open.
Figure out what I want the CUE Knob to do, and how to translate the CUE (endless encoder)
Figure out storing and recalling values for parameters (maybe a job for M4L?)
Make a preset for restoring bluehanded device to default values, AND another for resetting ALL devices to default values.
Eventually figure out a step sequencer for the Drums (something like Mark Egloff's sequencer with velocity)

I will eventually make a link to download my entire Live set, but for now I need to make sure I am not sharing anything that is not legal to share.
Attachments
APC40 MODES v18.bmtp
(269.61 KiB) Downloaded 604 times

JuanSOLO

2012-05-26 21:01:45

So how do you keep the "RED BOX" from updating LED's when in other modes besides default matrix mode?

JuanSOLO

2012-05-27 22:11:08

Another question besides the one above.

How do you translate the 'Track Control Knobs' properly in Bomes.
I have:
IN, B0 30 xx
OUT, 90 48 xx

however when used like this, the parameter I am mapped too jumps back and fourth between all the way down and all the way up, like a stuttering.

DvlsAdvct

2012-05-27 22:41:25

Well hello again Juan. :)

I'm on the road so I can't terry these solutions, but if you change the 90 48 xx to B0 48 xx does it work?

As for the red box, can you check your log window and see if any translators are sending unwanted output messages to the apc40? That might be the route of the problem. Or it could be the midi thru settings.

Let me know
J

JuanSOLO

2012-05-28 00:22:31

Well thanks for taking the time to respond!

I got a suedo work around thing going for the Knobs using M4L, so that one is a bit on the back burner for now.
My big concern is the RED BOX.

My MIDI IN Port is just the APC40
My MIDI OUT Port is Bomes Midi Virtual 1
in the MIDI ROUTER Section I have a connection going from the APC40 to Bomes Virtual 1
and a connection going from Bomes Virtual 1 to the APC40

So I am assuming I need to find some way to isolate all of my custom MODES from receiving the router input from the APC40.
And when in Default that connection needs to be there?

DvlsAdvct

2012-05-28 03:48:31

Alright, try removing the connection between the Bome Virtual 1 and the APC40.

Also, make sure that whatever presets you have that handle the standard APC40 mode are off.

My concern is that there's a crossed wire, and Ableton is sending information to the APC40 directly. Are there MIDI outs in Ableton set to the APC40?

ps... yay 101 posts in this thread :)

JuanSOLO

2012-05-28 08:05:41

First off, 101 posts! DANG!!!, yet I could shoot for 501 really.

I tried just removing some connections in Bomes, but lost functionality on other things.
I DO have the APC40 out in my Live preferences, checked for Track and Remote (to be clear I have 'APC40 Bomes Virtual Midi 1' checked for Track and Remote)

I was thinking the solution has to be somewhere with the Bomes Virtual 2 port. So basically I would be sending my custom modes on Virtual 2, and the default behavior on Virtual 1.
My head is now spinning.

This is where I am a bit confused with Bomes. What is the relationship between the MIDI IN and MIDI OUT Ports with the MIDI ROUTER, and what is the relationship to ALL of that with the Ableton Preferences?

I tend to think in terms of hardware i.e, effects pedals etc...
If I have MIDI IN from the APC40 and MIDI OUT to Bomes, what the hell is the MIDI ROUTER doing? Whats it's purpose?

Again, thanks for the help, it's been a real treat. I feel like I understand globals, rules, etc much more. What baffles me, is my instinct to set a conditional that reads "=="to but what I really need is a conditional that says "=!"

However I have made some breakthroughs with my Bomes Template, lots of cool shit using Bomes. THANK YOU.

DvlsAdvct

2012-05-29 15:55:49

The MIDI router works as an editable pass through. So, say you have a single message you want edited on your controller, but everything else to send through just fine. You'd use the MIDI Router to have all messages send from the controller to the software, but you'd use the preset and translators to change the individual messages you want altered. Or, if you want to use the state of one controller to augment the state of another controller, but you don't want to translate anything, you could use it as a through to the software, but use MT to store states or values. Make sense?

I'm pretty sure you have Ableton set up properly, not communicating directly with the APC40, but instead with MT, which sends to the APC40. I think the problem is there is a connection between Ableton and the APC40 open in your MT preset. As an example, if you have, in the MIDI router, the input port that Ableton is sending to connected directly to the APC40 (so if the APC40 is sending to Bome Virtual MIDI 1, and you have a connection between that and the APC40 in the MIDI router), it may be sending messages directly through the router, past the translation process and hitting your APC40 with updates. I know you said you lose functionality, but if you disconnect ONLY the MIDI connection between Ableton and the APC40 in the Router does it still update the red box? If not, then what you may need to do is put an entry in your standard APC40 mode to tell it to just pass everything from the Virtual MIDI 1 to the APC40.

Make sense?

Also, you know there is a conditional for "!=" and not =!, right?

JuanSOLO

2012-05-29 16:05:35

DvlsAdvct wrote: I know you said you lose functionality, but if you disconnect ONLY the MIDI connection between Ableton and the APC40 in the Router does it still update the red box? If not, then what you may need to do is put an entry in your standard APC40 mode to tell it to just pass everything from the Virtual MIDI 1 to the APC40.

Make sense?
AH HA. Yeah if I unplug that connection in the Router the Red Box does NOT update. SO it's just about passing that in my default mode. hmmm
DvlsAdvct wrote:Also, you know there is a conditional for "!=" and not =!, right?
yes, just misspelled it. What I was saying is my instinct is to compare in an "equal too" fashion, but what is needed usually is "not equal too"

DvlsAdvct

2012-05-29 16:10:26

JuanSOLO wrote: AH HA. Yeah if I unplug that connection in the Router the Red Box does NOT update. SO it's just about passing that in my default mode. hmmm
Exactly. The easiest way I could think of to handle this would be to have a qq pp rr translator in your default mode that only handles the grid (so probably only note messages and not CC for the knobs, right?) or something along those lines.
JuanSOLO wrote:yes, just misspelled it. What I was saying is my instinct is to compare in an "equal too" fashion, but what is needed usually is "not equal too"
Right, that's my point. You can use != instead of == for "does not equal". That's even more secure, generally, than the == rules.

JuanSOLO

2012-05-29 16:16:09

OK, thats making since fer sure. I will try this as soon as I get home.

THANKS! Things are shaping up nicely.

DvlsAdvct

2012-05-29 16:22:57

As always, let us know how it goes :)

JuanSOLO

2012-05-31 06:08:45

AWESOME.

So I blocked the Default matrix from updating LED's while in other modes and scrolling the 'redbox' around.

Basically I added a Preset that is only activated when in my custom modes.
This preset has 2 translators for each Matrix button
for example
Translator 1 "Clip 1"
IN - 90 35 xx (swallow)
OUT - nothing
Translator 2 "Clip 1"
IN - 80 35 xx (swallow)
OUT - nothing

This preset is set to receive Specific Ports input from Bomes Virtual In 1
AND Specific out ports to the APC40.

What was strange to discover was this seemed to automatically disable the Scene Launch buttons even with the redbox still moving around AND absolutely NO Scene Launch tranlators anywhere in my template.
SO, I made another preset just to pass the Scene Launch buttons and that worked!

SUPER STOKED, this part has been a big hurdle in actually performing with this rig.
Big thanks to DvlsAdvct!!! I need to buy you a drink or something.

NOW, on to my next question.
I have been using my bank buttons for "Resetting" some of my Effects racks to default states. I like this because the APC40's bank buttons point UP to the Track control knobs and DOWN to the device control knobs. So what ever those knobs are currently controlling can be reset swiftly.
What I want to do is scroll the redbox up and down using the CUE knob.
I found a thread where Florian give and example of how to translate an encoder to key up and key down.
http://www.bome.com/forums/viewtopic.ph ... oder#p9352
I tried that with no success.

Currently I got:
Translator 1 - "CUE DOWN"
IN - B0 2F pp
rules
if pp<65 then exit rules, skip Outgoing Action
pp=pp-64
OUT - Timer "Bank DOWN"
'once' 2 ms delay

Translator 2 - "CUE UP"
IN - B0 2F pp
rules
if pp>15 then exit rules, skip Outgoing Action
OUT - Timer "Bank UP"
'once' 2 ms delay

Translator 3 - "Cue Bank UP"
Stop Translating after executing this translator
IN - Timer "Bank UP"
OUT - 90 5E 7F

Translator 4 - "Cue Bank DOWN"
Stop Translating after executing this translator
IN - Timer "Bank DOWN"
OUT - 90 5F 7F

What am I doing wrong here?

DvlsAdvct

2012-05-31 15:02:17

Well, the encoder messages are very different from what yours should be. The first thing you need to do is open the log window and turn the knob. You need to see what signals it's sending. Does it send a 0-127 signal, a 63/65 message, a 1/127 message, etc. That's the only way for us to figure out how to code the rules.

Make sense?

JuanSOLO

2012-05-31 16:29:31

Turned one way it goes from 127 down to maybe 123, and when turned the other way goes from 0 - 4, i think.
And the value coming out is dependent on how fast it's turned maybe?

DvlsAdvct

2012-05-31 19:04:23

ALright, so if you replace your rules to reflect that it should work fine. So, it should be the same incoming message, but the < value should be 64 and the > value should be 64. That way when you turn it in either direction the translator will only trigger if the signal is above or below the middle value. Generally that's the easiest way to handle it. Make sense?

Zac Kyoti

2012-06-09 10:04:46

Hey Juan, this is way late on this I know, (haven't visited Bomes forum in a while) but I have something that may be of use to you. I had issues with the red box and use of the virtual midi router as well. In my project I needed to eliminate that thru connection entirely, and do everything direct via translators. I found that for my purposes the only real reason I needed the thru connection was to establish the red box (or so I thought). Really all that was happening was the APC40 handshake key call/response, which doesn't actually have anything to do with the red box. But if I didn't use that thru connection nothing would work. Turns out that without the thru, the handshake would obviously fail, which would cripple the APC. My solution was to edit the Python script to simply remove every element of the handshake/key routine. Now the APC works perfectly with the red box, two-way comm, and NO virtual midi connection. Much cleaner. I can provide you with the script if you want to give it a shot!

JuanSOLO

2012-06-09 13:21:50

I would LOVE to try that!

Zac Kyoti

2012-06-10 07:51:52

Ok. I'm at a friend's wedding this weekend, so it'll be sometime next week when I can get to it. If I zone out just drop me a pm to remind me! I think you'll like it, nothing has been changed at all in the script aside from removal of that key dialog. Definitely makes working with Bomes / APC easier though!

Zac Kyoti

2012-06-19 08:38:02

Hey Juan, sorry to get back to you late, been busy. Here is a dropbox link for the remote script. Copy to your remote scripts folder as usual. Red box with no midi thru in Bomes!

https://dl.dropbox.com/u/24506425/APC40_Kyoti_Hack.zip

JuanSOLO

2012-09-17 06:26:48

How do you create a toggle button on the Matrix with LED Feedback?
For example I have a mode I get into and I want the Matrix buttons to act as toggles, with LED feed back for on and off.

THANKS!

JuanSOLO

2012-09-30 22:02:15

anyone know the answer to the above question?

DvlsAdvct

2012-09-30 22:34:16

Are we still just talking about in MT, or is this a problem with Ableton?

JuanSOLO

2012-09-30 22:40:38

I'm not sure.

I want a matrix button to work as an on off toggle.
For some reason that seems really confusing.
If I have the incoming button press
90 35 7f and translate that to say 9c 00 7f
and 80 35 7f to 8c 00 7f
and map that to something in Ableton it behaves as a toggle.
NOW to get the LED to reflect that I have no idea?
The 90 35 7f should be sent back to the APC40 as 90 35 7f as well as the 80 35 7f, but then I still get a toggle but the LED feedback works in momentary fashion.

using CC commands instead of note on off behaves differently, still confusing?

JuanSOLO

2012-09-30 23:09:56

this is really confusing.
There are other buttons like the MUTE's in which I have them translated
in ports APC40
90 32 7F > 90 32 7F
80 32 7F > 80 32 7F
out ports BMT
and that works with the LED info

if I do that SAME thing for the Matrix button
in ports APC40
90 35 7F > 90 35 7F
80 35 7F > 80 35 7F
out ports BMT
I get toggling but no LED info?

JuanSOLO

2012-10-01 00:21:55

another question.

How do I translate the F8 Timing Clock to something useable?

DvlsAdvct

2012-10-01 00:35:24

For the F8 thing, you can. If you're reading from Traktor, as an example, it's 24 F8's to a beat. So you can set a global variable to that and have timers for it to do cool stuff, if ya want.

As far as the Matrix, cause you're not using the red box, you can't REALLY toggle things on and off, only whether or not the track is playing, or the CURRENT clip is playing. It's a pain in the ass. You're talking about the Session View grid, right?

JuanSOLO

2012-10-01 01:04:06

Well for the Toggles I am using a custom Mode for the Matrix, so in that Mode nothing passes to the RedBox.

I am basically trying to make a running light on a 16step sequencer (2 rows of matrix buttons)
and these 2 rows of matrix buttons act as on/off switches for that step.
I am using a dummy clip in Ableton that sends to the APC40 through Bomes, this dummy clip creates the running light.
So it would be nice to figure out how to us the f8 timing clock to make the running light instead of a dummy clip.

I have this running light going to all of the APC40's knobs too.

In the end I want this 16step sequencer mode to work like this
2 rows of Matrix buttons with a running yellow light, if a step is ON the light would be green, if OFF the light would be off, UNLESS the running light is on that step, then its yellow
The Knobs have 3 modes within this, 1 for Pitch, Velocity, and Gate. I have the knobs working where the running light makes a full ring, and when the running light moves on to the next step it leaves the Knobs light at it's value.

DvlsAdvct

2012-10-01 01:10:16

Oh, then you aren't looking for LED feedback from Ableton, right? You just want to handle the LEDs directly in MT?

JuanSOLO

2012-10-01 01:33:15

YEAH, i think thats right

DvlsAdvct

2012-10-01 02:28:54

Okay. What you can do is set a MIDI track to output a downbeat (assuming you want your step sequencer to be 1 beat for each square) and have this signal set off a timer. When that timer goes off it counts up a global variable. Based on that global variable the correct square would go off. Actually... you'd have a translator receiving the MIDI signal to base the global variable off that sets off a timer. This has no rules.

Within the preset you're activating, you'd have this timer begin counting off a global variable (1-16) and triggering ANOTHER timer to get your LED feedback. That would be he cleanest way for it to be on the clock.

Make sense?
J

JuanSOLO

2012-10-01 16:37:32

Took me all night to digest that.
I dont mind running clip information like this, but I would really like it to be receiving the midi clock from Ableton and run a sequencer within Bomes translating that information.
So why would the way your suggesting be the cleanest way?

I found this thread, dont quite understand it though. I dont understand some of the rules.
http://www.bome.com/forums/viewtopic.ph ... +Sequencer

I'm certain it can be done, I just know know enough.

DvlsAdvct

2012-10-01 17:01:53

Hi Juan

Realistically, using a Clip to send MIDI information is the same as sending clock information. That clip is always sync'd to the clock and it's easier to digest the information in MT.

If you want to interpret the F8 information instead, you'd need to have a global variable count to 24 (I believe that's how many are set to the beat), and every time it hits 25 it needs to reset to 1 (if >24 then =1) a timer goes off triggering the downbeat of the clock. That make sense?

It would look like

Code: Select all

Translator 1: Incoming Clock
Incoming Message: MIDI F8
Rules:
g0=g0+1
if g0>24 then g0=1
Outgoing Message: Clock Timer 0ms delay

Translator 2: Clock Timer
Incoming Message: Clock Timer
rules: if g0!=1 then exit rules, skip outgoing action
Outgoing Action: Downbeat Timer 0ms delay
So every time the downbeat timer goes off your step sequencer would kick forward a beat. Something like

Code: Select all

Translator 3: Step Sequencer
Incoming Message: Downbeat Timer
Rules: g1=g1+1
if g1>16 then g1=1
Outgoing Action: Step Sequencer Timer 0ms
And then the step sequencer timer will count up the values of the step sequencer lights. They will only light up every beat. You could also divide it up and have different conditionals so you count the downbeat, up beat and quarter beats, even down to 32nd notes. Just gotta set the variables.

That make sense? The same logic applies for the MIDI clip as well.

JuanSOLO

2012-10-01 17:17:59

OK, gonna try this later.

I guess my thinking about using a Clip it adds another layer to pay attention too in Ableton. So it sounds good to build it into the template to me.
Thanks for the help man, I'm sure I will be full of questions once I give this a shot.

DvlsAdvct

2012-10-01 17:31:58

That's true. BUT what it also does is allows you to tie the activation of that clip to a preset. So when you activate the preset it triggers the clip, quantized to the beat or the measure (or however you want), so it always follows, and is not always sending data like the clock will. You can also set different clips with different note lengths communication.

Don't hesitate to bring questions, dude. You see how long this thread's going, we never send people away :p

J